Installation of a Backup Camera in My Car
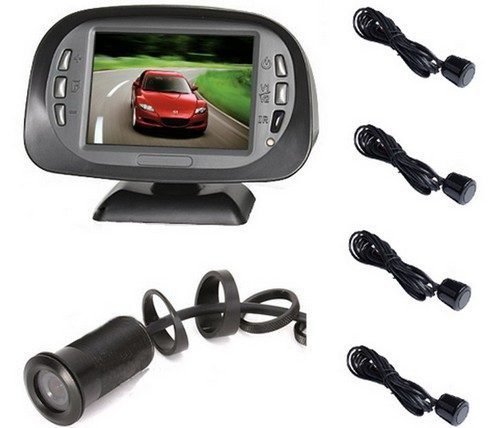
A car owner better understands the security requirements related to his vehicle. Surprisingly, lots of horrific accidents happen when cars go back on driveway. Children may frequently be loitering about undetected or unseen. In this case, a backup camera is very useful and quite easy to install as well. But at this moment, one may ask himself that how to install a backup camera in my car?
Required Materials
There are certain tools or materials that you will need to install backup camera in your car. These include:
- Back-up camera kit of choice
- Hole edge protectors
- Sheet metal tape
- Necessary Tools
- Drill with larger drill bits
- Wire snips and cleaners
- Electrical tape
- Wire pull
- Hardware

Generally, there are two major types of back up cameras. First one is a wireless device that merely attaches the hardware at preferred locations. The second kind of back up camera is a device that involves running wires by means of headliners of the car. Both types are effective and helpful, but wireless device may offer some seconds delay as compared to the second device.
Hardware Installation
Let us start with hardware installation. You have to initiate the wire installation by drilling a hole into the cargo vicinity for the camera. At mean while, you must keep in mind that location as well as angle of camera ought to produce the widest achievable viewing region. Then move ahead with installing a rubber gasket ring into the hole so that no wire chaffing or camera damage occurs because of driving conditions.
Now, install the monitor base. Usually, the majority of monitor bases, wireless or wired, fit properly over the back view mirror bracket and are furthermore supported by two sided tape to the front windscreen. Metal sheeting tape will work fine for addition of the controller unit to the cars sheet metal body frame inside the vehicle and at the back of some plastic part. Don’t forget to ensure connecting a grounding wire to the car’s bare metal.
Wiring:
Now, it is time for wiring. By means of a wire pull, direct the wiring through the liners of the car to the rear cargo area housing the camera. Let leave quite a bit of additional wire once you have arrived at the cargo area. Then use to wire the controller unit into the camera as well as vehicle’s 12 volt back up lamp.
Override and live wire:
With the aim of putting off a live wire going to the back up lights you will require installing a diode override switch. This installation is supposed to be done at the back of the radio system. It will take considerable amount of time to take away the radio, dashboard as well as wiring this into system.
Now you have to drill a hole into the dashboard for the switch and employ a rubber gasket for unit protection. Wire the switch plus diode into the power wiring system for the radio and the controller unit.
Testing:
Sooner than you start on to put the dashboard and radio unit back into place, test out to observe that the unit is functioning properly. At the moment, you may perhaps want to check your wiring. If a connection has not been wrapped in electrical tape ensure that it gets wrapped. Furthermore make certain that all of the connections are fixed. And you should keep in mind that pushing around in a moving vehicle will simply loosen a weakly done wire connection.
So, follow the steps given above to properly install a backup camera in your car.


